19 企业员工AI助理编程:实现多Agent
你好,我是李锟。
在上一节课中,我们探索了开发 AI 助理面临的两个技术难题,一个是支持语音输入,另一个是将 Web 应用与 AutoGPT Server 连接。我们初步确定了解决这两个难题的技术方案。这两个难题是两个不同的方向,可以独立解决,并且持续优化。这节课我们真正开始 AI 助理的开发工作。
AI 助理的分层架构
清晰的分层对于一个 Autonomous Agent 应用来说同样重要,我们从确定 AI 助理的分层架构开始开发。
第一版——四层架构
根据上节课的内容,我画了一个 AI 助理的部署图:
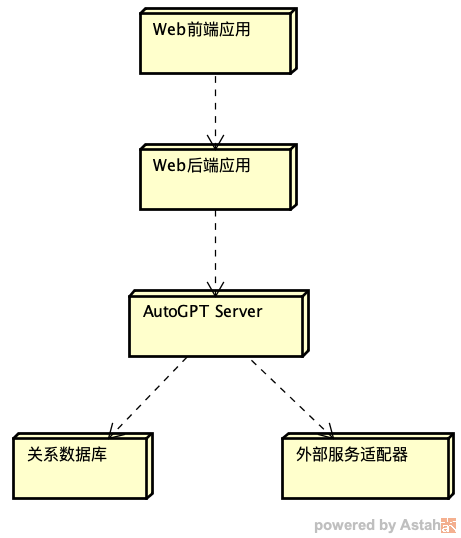
按照这个部署图,AI 助理可以简单划分为 4 层,从上到下单向依赖。最上层是 Web 前端 PWA 应用(JS语言实现),为 AI 助理提供 UI,包括 GUI 和 VUI(语音用户界面)。第二层是 Web 后端 FastAPI 应用(Python语言实现),为 Web 前端应用提供 RESTful API 和 WebSocket API。第三层是 AutoGPT Server,在其中运行多个业务相关 Agent,为 Web 后端提供 RESTful API 和 WebSocket API。最下面的第四层是基础设施层,包括关系数据库、外部服务适配器等等。
这个分层架构非常容易理解。 支持 WebSocket API 是为了获得更好的用户体验。当运行于 AutoGPT Server 中的某个 Agent 需要向 Web 前端的用户提供反馈(通知、建议、求助等等)时,使用以“推”方式工作的 WebSocket API 会比使用以 “拉” 方式工作的 RESTful API 更加高效。
尽管实现了系统分层,AI 助理仍然是一个单体应用(Monolith Application),而不是分布式应用(Distributed Application)。要实现应用的水平扩展(Scale Out),服务器端应用应该尽量做到无状态(Stateless)和 Share Nothing。关于 Share Nothing 架构可参考这篇文档:分布式系统的先见之明:Shared Nothing架构。
第二版——三层架构
不过上述四层架构看起来还是有些复杂。虽然分层是计算机行业解决复杂问题的常用方法,应用的分层并非越多越好,多分出来一层就会多出来不少复杂度。按照著名的“奥卡姆剃刀原则”,我们应该在满足业务需求的前提下,持续不懈地追求最简化的架构。
AutoGPT Server(backend)本身就是一个 Web 应用,同样基于 FastAPI 开发。我们可以考虑把 Web 后端应用与 AutoGPT Server 合并在一起。Web 后端应用不再通过 RESTful API 来调用 AutoGPT Server,而是通过本地 API 调用 AutoGPT Server。按照这种设想的新的分层架构如下图所示:
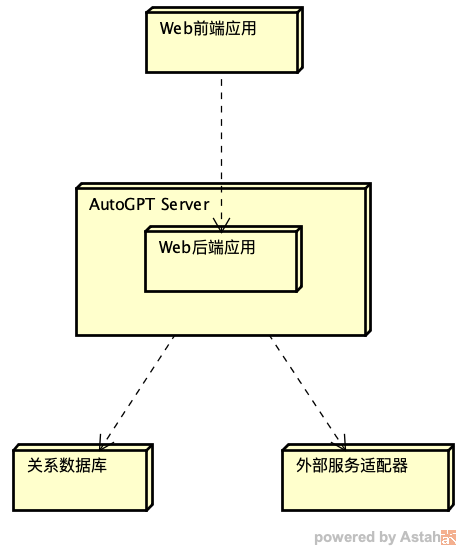
按照新的部署图,Web 后端应用与 AutoGPT Server 合并为一层,AI 助理一共只有三层。
那么具体如何实现 Web 后端应用与 AutoGPT Server 的合并呢?我们需要把上节课创建的 ai-assistant 项目与 AutoGPT Server 合并在一起。
cd ~/work/ai-assistant
mkdir -p backend/blocks/customized
mkdir -p backend/server/customized
# 将 09 课的 Block 例子 get_wikipedia_summary.py 复制过来,以便做测试
cp ../learn_autogpt/backend/blocks/customized/get_wikipedia_summary.py backend/blocks/customized/
cp main.py backend/server/customized/
然后修改 ~/work/ai-assistant/backend/server/customized/main.py,找到 app = FastAPI(debug=True) 这一行,将 app 改名为 customized_app。并且把这一行以下所有引用 app 的地方都改为 customized_app。
修改 ~/work/ai-assistant/static/main.js,找到 const response = await fetch('/download/', {这一行,改为 const response = await fetch('/customized/download/', {。
修改 ~/work/ai-assistant/templates/index.html,找到 <script src="/static/main.js"></script> 这一行,改为 <script src="/customized/static/main.js"></script>。
完成了对 ai-assistant 项目的修改,接下来我们对 AutoGPT Server 做一些修改。
cd ~/work/AutoGPT/autogpt_platform/backend
cd backend/blocks
# 将定制 Block 目录的符号连接改到 ai-assistant 项目下
rm customized
ln -s ~/work/ai-assistant/backend/blocks/customized .
# 再创建一个 AutoGPT Server 新增的 api 目录的符号连接
cd ../server
ln -s ~/work/ai-assistant/backend/server/customized .
cd ../..
# 为 Web 前端应用相关内容创建符号链接
ln -s ~/work/ai-assistant/static .
ln -s ~/work/ai-assistant/templates .
然后为 AutoGPT Server 添加一些依赖的 Python 库。
cd ~/work/AutoGPT/autogpt_platform/backend
poetry add $(cat ~/work/whisper-website/requirements.txt)
poetry add uvicorn fastapi ffmpeg srt llvmlite numba stable-ts deep-translator python-multipart torch
修改 backend/server/rest_api.py,在其中添加两行。
...
from backend.server.external.api import external_app
from backend.server.customized.main import customized_app # 新增一行
...
app.mount("/external-api", external_app)
app.mount("/customized", customized_app) # 新增一行
完成了上述修改后,使用 poetry run app 重新启动 AutoGPT Server。在另外一台客户端机器,打开浏览器,访问:http://<server_host_ip>:8006/customized/。server_host_ip 需要替换为 Linux 主机的 IP 地址。如果一切正常,浏览器会打开上节课我介绍过的 Whisper 测试页面。重新上传那个《让子弹飞》台词片段文件做一下测试。
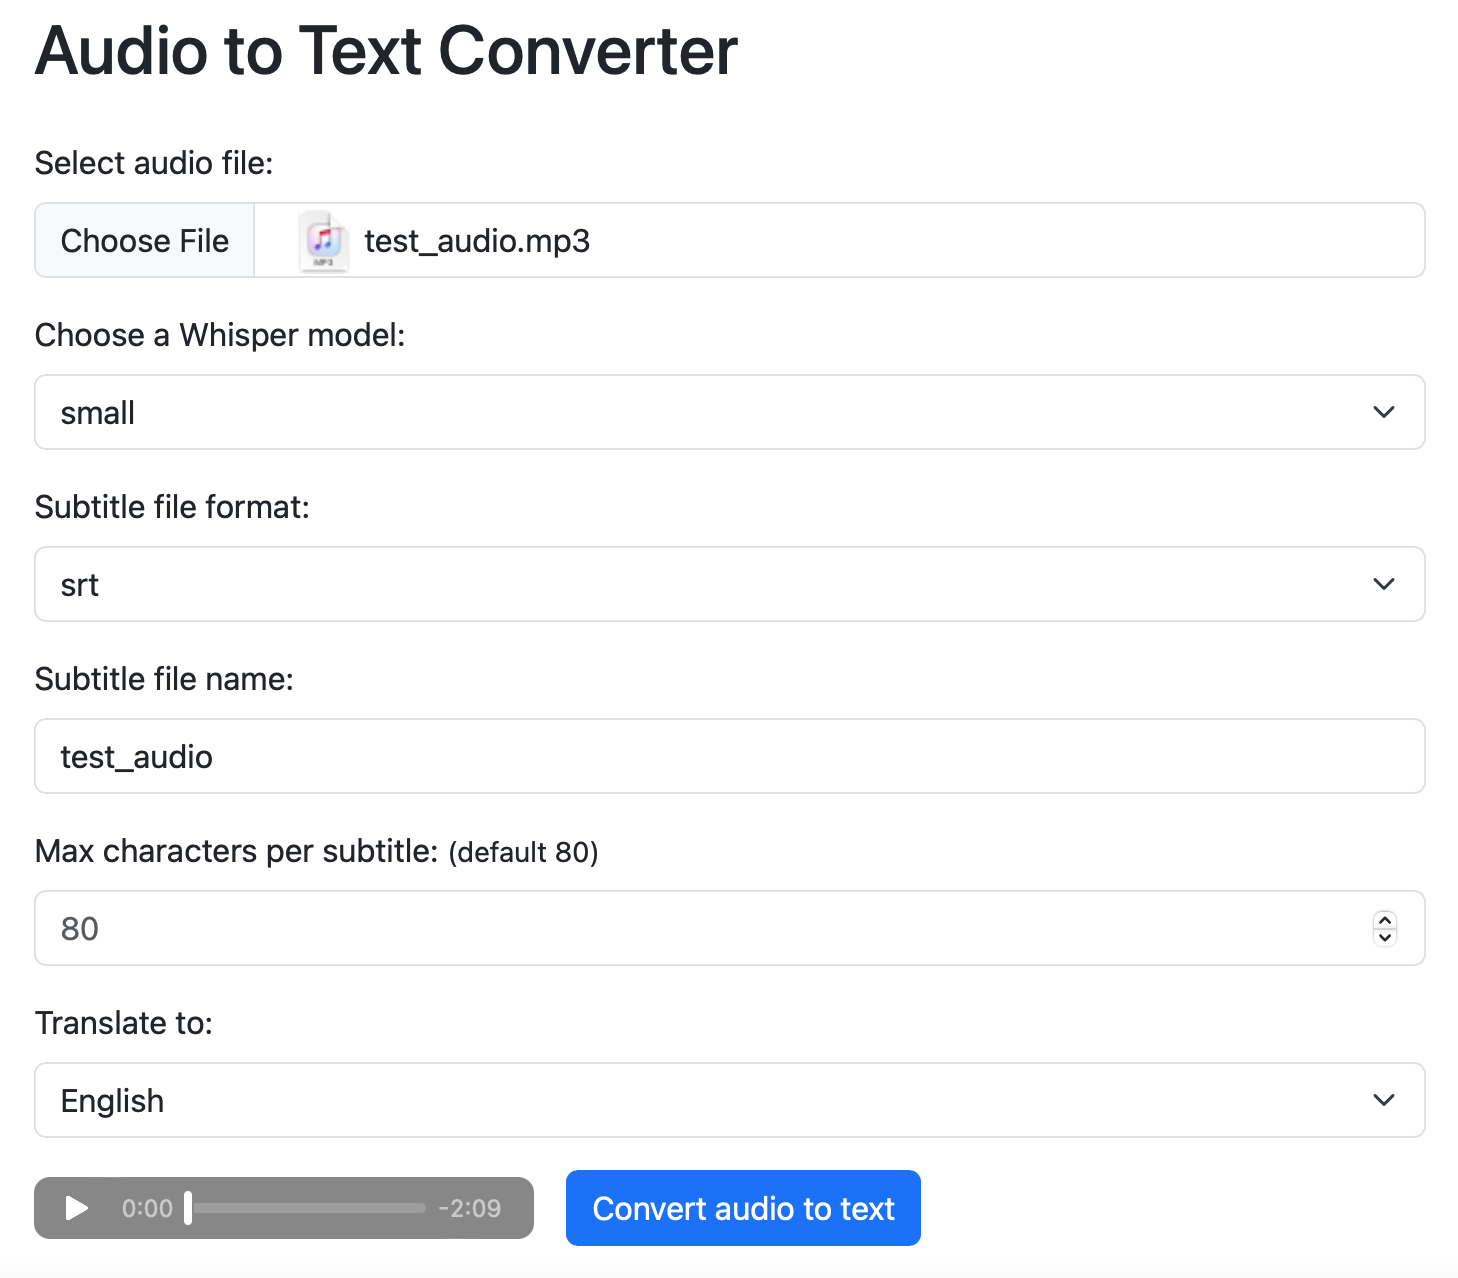
测试过程与上节课一样。如果成功下载到了翻译为英文的字幕文件 test_audio.srt,那么 Web 后端应用与 AutoGPT Server 的合并工作就成功了。我们在 AutoGPT Server 原有的 RESTful API 中添加了一套前缀为 “/customized” 的新 API,用来支持 Web 前端应用。
所有 Web 后端应用相关代码都在 ~/work/ai-assistant 目录内,通过符号连接添加到 AutoGPT Server 的目录 ~/work/AutoGPT/autogpt_platform/backend 下,这样可以有效地分离关注点,不至于对 AutoGPT Server 做过多修改,影响到日后更新官方代码。目前 AutoGPT Platform 处于高速开发阶段,因此时常更新官方代码是非常重要的。
注意:将 Web 后端应用合并到 AutoGPT Server 之后,如果面向外网暴露 AutoGPT Server,必须把身份认证设置打开 (.env 文件中 ENABLE_AUTH=true),否则会有严重的安全问题。
Web 后端应用与 AutoGPT Server 合并之后,一个好处是它不需要开发自己的用户和身份认证功能,直接使用 AutoGPT Server 的用户和身份认证功能就可以了。
BTW,我为企业员工 AI 助理创建了一个开源项目,地址是:https://gitee.com/mozilla88/ai-assistant。对这个项目的后续开发感兴趣的学员,可以关注这个项目。
那么如何通过本地 API 而不是 RESTful API 来调用 AutoGPT Server 执行某个 Agent 呢?这个问题我已经解决,我会把例子代码提交在课程的 gitee 项目中。
在这一课中,我们把前端 UI 的开发暂时先放一下,聚焦在后端核心的 Autonomous Agent 开发方面,基于 AutoGPT Server 实现 AI 助理的智能体应用。
如同前面我们分别使用三个 Autonomous Agent 开发框架实现 24 点智能体一样,我们要做的第一步还是角色建模,即确定在 AI 助理的智能体应用中,我们需要实现几个 Agent,每个 Agent 需要调用几个 Block。
AI 助理智能体的角色建模
在上节课我们实现了通过 RESTful API 调用 AutoGPT Server 中的 Agent。这些代码可以加入到 Web 后端 FastAPI 应用中,不过按照简化后的三层架构,从 RESTful API 调用改成了本地调用。
接下来我们要确定的是 FastAPI 应用需要与 AutoGPT Server 中的几个 Agent 打交道。
AI 助理的功能划分
根据 17 课中初步的领域模型设计,AI 助理需要完成的工作,可以划分为以下 6 类:
- 对于 idea + basket、action + project、checklist 的增删改查。
- 对于外部系统和相关工具的配置。
- 执行 action 相关功能,可以分成两类:在线下执行,完成后修改 action + project 的状态;在线上执行,调用某个外部系统的工具,完成后修改 action + project 的状态。
- 回顾相关功能,包括手工编辑回顾和AI 自动生成回顾。
- 性能评估 + 优化相关功能,包括手工编辑评估和优化建议,以及AI 自动生成评估和优化建议。
- 通知相关功能,包括通知渠道的管理和配置,以及通过某个渠道发送通知。
这些功能是否适合使用 AutoGPT Server 实现?
我们需要思考一个问题:上述这 6 类功能是否都有必要使用 AutoGPT Server 来实现?或者说,如何确定哪些功能需要放在 AutoGPT Server 中实现,哪些功能不用放在 AutoGPT Server 中实现?这个问题可以遵照这两个判断标准来解决:
- 从理论上来说,所有不需要与用户反复交互的功能,像 ChatBot 那样,都可以放在 AutoGPT Server 中实现,无论这个功能是否真的与 LLM 和 AI 相关。
- 某个功能对性能要求如果很高,希望在极短时间完成,那么现阶段不适合放在 AutoGPT Server 中实现,因为 AutoGPT Server 目前性能还无法满足苛刻的要求。
对于 AI 助理的上述 6 大类功能来说,它们都不需要与用户反复交互,也没有特别高的性能要求,因此都可以放在 AutoGPT Server 中实现。
确定 AI 助理的入口 Agent
那么我们可以把上述这 6 类功能的职责划分给 6 个入口 Agent。给它们分别取名:
- CollectionAgent
- RelevantSystemAgent
- ActionExecutionAgent
- ReviewAgent
- PerformanceAgent
- NotoficationAgent
如果未来用户希望在 Web 前端应用中完全使用自然语言来交互,那么在 6 个对象之前我们还需要有一个前置的分发功能,使用一个比较强大 LLM 识别出用户是需要完成 6 大类中的哪一个小类的功能,然后再分别调用 6 个入口 Agent。我们给这个前置的分发功能取名叫做DispatchManager。
通过以前的学习,我们理解 AutoGPT Server 支持 Agent 的嵌套。上述这 6 个 Agent 其实只是相关功能的入口 Agent,针对每个入口 Agent,在 AutoGPT Server 内部我们还需要实现更多细粒度的 Agent 以及相关 Block。这些入口 Agent 将调用那些细粒度的 Agent,完成具体的任务。这节课我们先聚焦在入口 Agent,细粒度的 Agent 我们下节课再介绍。
实现入口 Agent 的框架代码
接下来我们分别实现 6 个入口 Agent。
确定每个 Agent 的输入和输出
在实现 6 个入口 Agent 之前,我们需要分别确定这 6 个 Agent 的输入和输出。
虽然 AutoGPT Serer 中的 Agent 可以接受多个输入,我们在 08 课实现 24 点游戏智能体时发现了,对于 AutoGPT Server 现有代码,当 Agent 有多个输入时,执行起来可能会不正常。所以这 6 个 入口 Agent 都只有一个 Agent Input,由实现入口 Agent 的 Block 代码根据输入内容来确定需要调用哪个下一级的细粒度 Agent。
同样,每个入口 Agent 的输出也只有一个,即只包括一个 Agent Output,由 Web 后端应用根据接收到的输出内容确定相关的处理。输入、输出的内容可以是自然语言文本,也可以是结构化的 JSON 等格式。
这节课我们先为这 6 个入口 Agent 创建框架代码,让这些 Agent 能够在 Agent Builder 中运行起来。Agent 中 Block 的实现将放在下节课中完成。这节课和下节课的内容,其实是密切相关的整体。
我拿实现两个有代表性的入口 Agent 来举例,CollectionAgent 和 NotificationAgent。CollectionAgent 的所有用户交互均由用户发起,而 NotificationAgent 的所有用户交互均由系统发起。
创建 CollectionAgent 的框架代码
我们实现一个 CollectionAgent 的入口 Block,取名为 CollectionFacadeBlock。代码在 ~/work/ai-assistant/backend/blocks/customized/ai_assistant/collection_blocks.py 中。
import logging
import random
from typing import Any, List
from backend.data.block import Block, BlockCategory, BlockOutput, BlockSchema, BlockType
from backend.data.model import SchemaField
from backend.blocks.llm import AIConversationBlock, AIStructuredResponseGeneratorBlock, LlmModel, APIKeyCredentials, AICredentials, AICredentialsField, TEST_CREDENTIALS, TEST_CREDENTIALS_INPUT

logger = logging.getLogger(__name__)

class CollectionFacadeBlock(AIConversationBlock):
PROMPT_TEMPLATE: str = """
请返回下面的内容:
{collection_input}
"""

class Input(BlockSchema):
collection_input: str = SchemaField(
description="collection input"
)
model: LlmModel = SchemaField(
title="LLM Model",
default=LlmModel.GPT4_TURBO,
description="The language model to use for the conversation.",
)
credentials: AICredentials = AICredentialsField()
max_tokens: int | None = SchemaField(
advanced=True,
default=None,
description="The maximum number of tokens to generate in the chat completion.",
)

class Output(BlockSchema):
collection_output: str = SchemaField(
description="collection output"
)
error: str = SchemaField(description="Error message if the API call failed.")

def __init__(self):
Block.__init__(
self,
id="e7f458ff-dd1d-4962-ac0b-0b12479f5bc6",
description="Advanced LLM call that takes a prompt and sends them to the language model.",
categories={BlockCategory.AI},
input_schema=CollectionFacadeBlock.Input,
output_schema=CollectionFacadeBlock.Output
)

def run(
self, input_data: Input, *, credentials: APIKeyCredentials, **kwargs
) -> BlockOutput:
collection_input = input_data.collection_input
prompt = self.PROMPT_TEMPLATE.format(collection_input=collection_input)
msg_list = [ {"role": "user", "content": prompt} ]
rsp = self.llm_call(
AIStructuredResponseGeneratorBlock.Input(
prompt="",
credentials=input_data.credentials,
model=input_data.model,
conversation_history=msg_list,
max_tokens=input_data.max_tokens,
expected_format={},
),
credentials=credentials,
)

collection_output = rsp
yield "collection_output", collection_output
重新启动 AutoGPT Server,在客户端启动 AutoGPT Frontent。在浏览器中使用 Agent Builder 创建一个 CollectionAgent。保存之后点击 Run 按钮运行,确保运行成功,如下图所示。
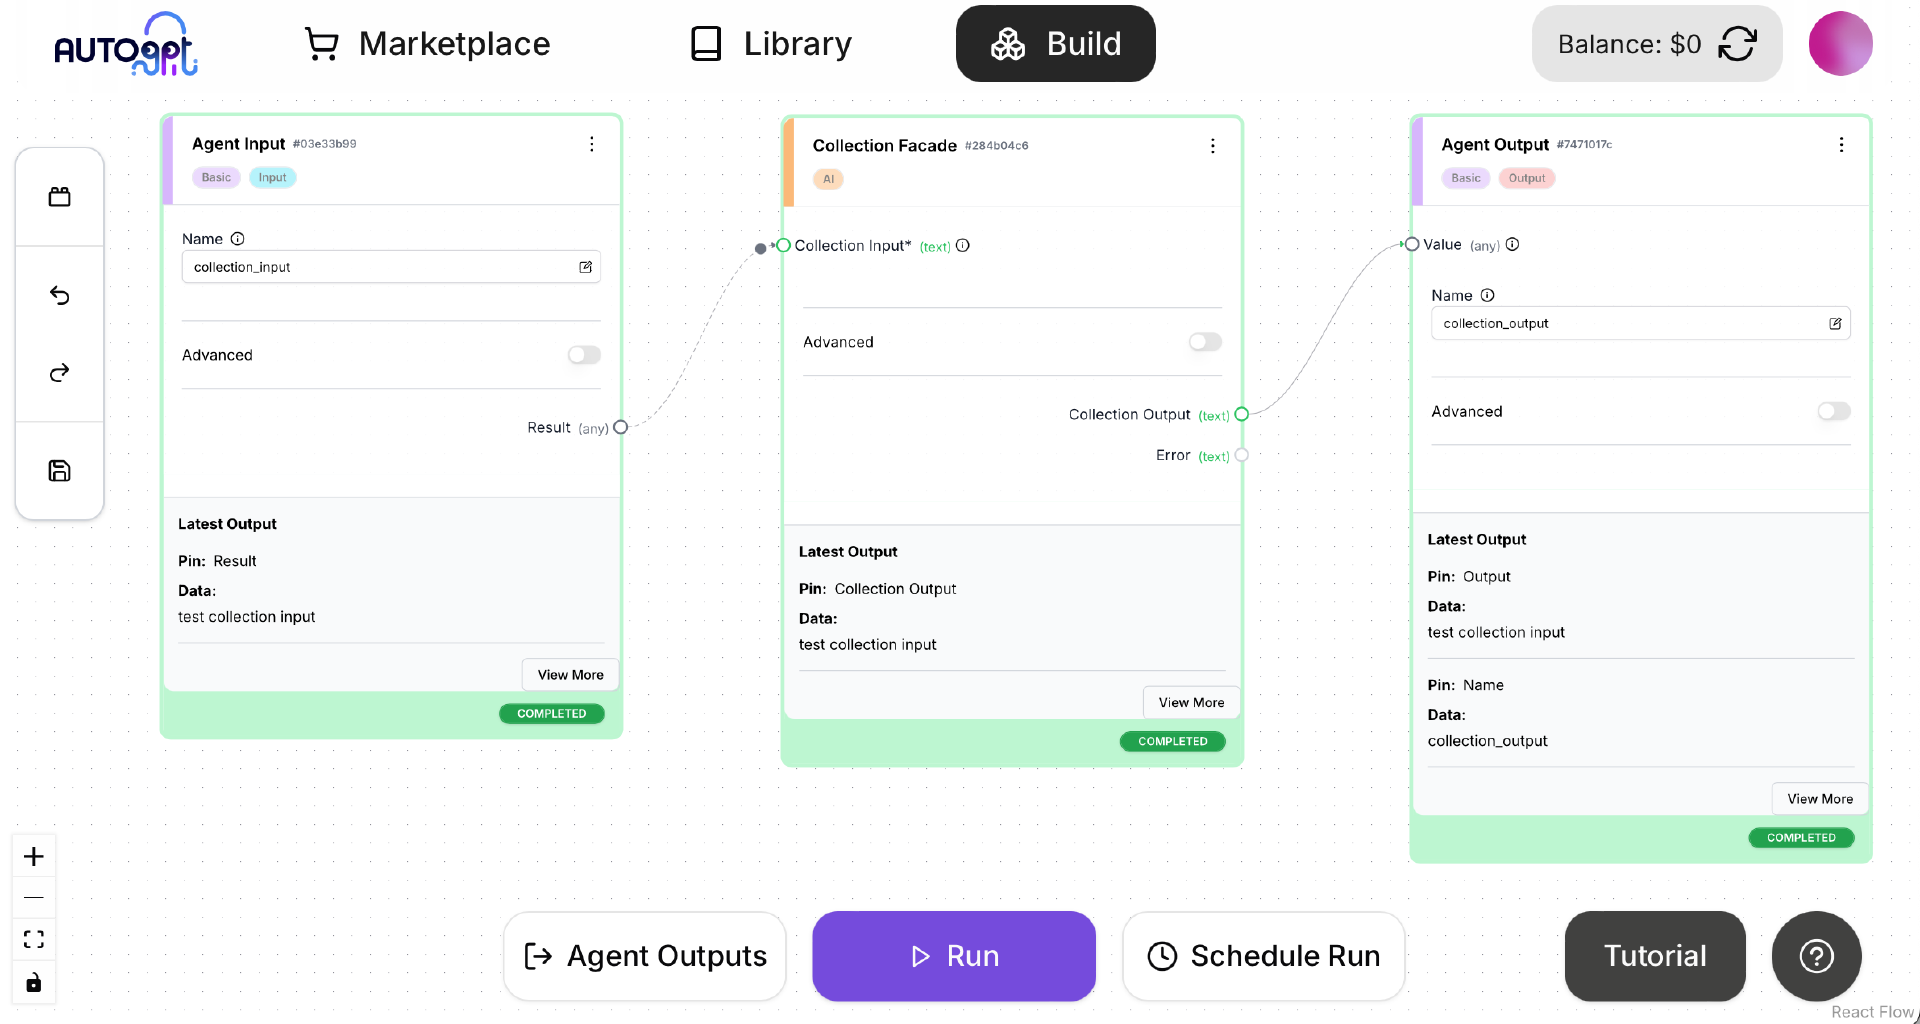
注意,在保存 CollectionAgent 之前,Collection Facade 这个 Block 的 LLM 应该选择 Qwen2.5,详情请参考 07 课内容。
创建 NotificationAgent 的框架代码
我们再实现一个 NotificationAgent 的入口 Block,取名为 NotificationFacadeBlock。代码在 ~/work/ai-assistant/backend/blocks/customized/ai_assistant/notification_blocks.py 中。
import logging
import random
from typing import Any, List
from backend.data.block import Block, BlockCategory, BlockOutput, BlockSchema, BlockType
from backend.data.model import SchemaField
from backend.blocks.llm import AIConversationBlock, AIStructuredResponseGeneratorBlock, LlmModel, APIKeyCredentials, AICredentials, AICredentialsField, TEST_CREDENTIALS, TEST_CREDENTIALS_INPUT

logger = logging.getLogger(__name__)

class NotificationFacadeBlock(AIConversationBlock):
PROMPT_TEMPLATE: str = """
请返回下面的内容:
{notification_input}
"""

class Input(BlockSchema):
notification_input: str = SchemaField(
description="notification input"
)
model: LlmModel = SchemaField(
title="LLM Model",
default=LlmModel.GPT4_TURBO,
description="The language model to use for the conversation.",
)
credentials: AICredentials = AICredentialsField()
max_tokens: int | None = SchemaField(
advanced=True,
default=None,
description="The maximum number of tokens to generate in the chat completion.",
)

class Output(BlockSchema):
notification_output: str = SchemaField(
description="notification output"
)
error: str = SchemaField(description="Error message if the API call failed.")

def __init__(self):
Block.__init__(
self,
id="6ea39467-743d-4d20-bc21-b0ab0664eb76",
description="Advanced LLM call that takes a prompt and sends them to the language model.",
categories={BlockCategory.AI},
input_schema=NotificationFacadeBlock.Input,
output_schema=NotificationFacadeBlock.Output
)

def run(
self, input_data: Input, *, credentials: APIKeyCredentials, **kwargs
) -> BlockOutput:
notification_input = input_data.notification_input
prompt = self.PROMPT_TEMPLATE.format(notification_input=notification_input)
msg_list = [ {"role": "user", "content": prompt} ]
rsp = self.llm_call(
AIStructuredResponseGeneratorBlock.Input(
prompt="",
credentials=input_data.credentials,
model=input_data.model,
conversation_history=msg_list,
max_tokens=input_data.max_tokens,
expected_format={},
),
credentials=credentials,
)

notification_output = rsp
yield "notification_output", notification_output
与创建 CollectionAgent 的框架代码类似,需要在 Agent Builder 中创建并测试 NotificationAgent。方法与 CollectionAgent 相同,不再赘述。
总结时刻
在这一课中,我们先优化了 AI 助理的分层架构,从四层架构简化为三层架构。接下来我们根据 AI 助理的功能分类确定了需要为 AI 助理实现的入口 Agent。然后创建了两个有代表性的入口 Agent 的框架代码。
这 6 个入口 Agent 的划分是粗粒度的,为何我没有划分出更多细粒度的 Agent 给 Web 后端应用直接调用呢?如果按照传统 OOD 的设计方法,确实会设计出来很多细粒度的 Agent。我只使用粗粒度的入口 Agent 的原因如下:
- 未来如果流量非常大,因为可伸缩性的原因,Web 后端应用仍然有可能与 AutoGPT Server 分离,也就是变成四层架构。Web 后端将改为通过 RESTful API 调用 AutoGPT Server。作为远程 API,RESTful API 应该设计为粗粒度的。
- 从长远考虑,我希望这 6 个入口 Agent 就像是真的具有智能的人类那样,我甚至可以完全用自然语言与它们交互。设计细粒度的 Agent 显然违背了这个目标,因为没有必要像操纵机器或者程序那样对待人类。
在下节课中,我们来具体实现这两个有代表性的入口 Agent,包括其调用的细粒度 Agent 和相关的 Block。
思考题
AutoGPT Server 适合于实现哪些类型的应用?不适合实现哪些类型的应用?欢迎你在留言区交流你的看法,也欢迎你把这节课的内容分享给需要的朋友,我们下节课再见!
- 颛顼 👍(0) 💬(1)
此处当流量大了以后,要水平扩展,是将 AutoGPT Server 进行多副本部署?那每个AutoGPT Server实例负责启动6个关联的agent?这块不太理解,AutoGPT Server 是如何做到水平扩展的
2025-02-21